Thursday, April 26, 2018

Kachka: A Return to Russian Cooking Kindle Edition by Bonnie Frumkin Morales and , Deena Prichep (Flatiron Books) (IBRCookBooks)

Kachka: A Return to Russian Cooking by [Morales, Bonnie Frumkin, Prichep, Deena]
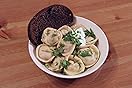
Since I have bought this cookbook I have made many recipes from it. The book is written with considerate clarity and the recipes though simple always yield deliciously comforting results. My favorites from Kachka are the pelmeni recipes. If you are like me, the idea of making your own dough for dumplings sounds awfully overwhelming. However, Morales promises so convincingly that a homemade dough is far better than anything you can find at the store and her instructions on how to roll out your own dough are straightforward and foolproof.

The ingredients lists are often short and simple. At times the recipes may recommend a trip to a Russian grocery store to find items, although clear instruction is usually given on how to select more obscure products or find substitutions.

There are many more recipes I can't wait to try. I've sampled a little of every chapter and can say that from appetizers to the sweets, everything was easy to understand and could be whipped up without too much stress even in my small apartment kitchen. The recipes feel like the kind that I will turn to again and again for any occasion whether you are entertaining, or looking to stockpile your freezer with homemade goods which can be made in an instant later. I highly recommend Kachka to cooks of all skill levels wanting to explore Russian cooking!

I was not paid for this review and have no affiliation with the author. I love cookbooks and review and write about them. Check out my instagram @theReadingCook for more photos and information about my experiences with Kachka.

Comment

Flavor Bombs: The Umami Ingredients That Make Taste Explode Hardcover – May 15, 2018 by Adam Fleischman (Author), Tien Nguyen (Author), Wendy Sue Lamm (Photographer) (Rux Martin/Houghton Mifflin Harcourt ) (IBRCookBooks), a review by the Bard of Bat Yam ( #BardOf BatYa) , Poet Laureate of Zion (#PoetLaureateOfZion) and Stephen Darori ( #stephendarori, @stephendarori)


The founder of the national empires Umami Burger and 800 Degrees Pizza shows how to detonate flavor in beloved dishes using ordinary ingredients high in umami

Why does everyone love burgers and pizza? When Adam Fleischman investigated, he discovered what they—and many other ultra-flavorful dishes have in common: umami. A renegade self-taught cook, Fleischman deployed this savory “fifth dimension of taste” to ratchet up flavor using ingredients naturally rich in umami, such as Parmesan, tomatoes, caramelized onions, and anchovy paste. In so doing, he created ultimate versions of icons, including Umami Burger with Port and Stilton, Sweet and Savory Brisket, and Parmesan Fondue. All the recipes are made from the same “umami pantry” ably explicated in the front of the book.

What are Flavor Bombs?

Looking for a great way to save time, money, and food? The answer is Flavor Bombs. They’ll make your meals easier, and much more delicious. But what are they and how do you make them? Cooking with Flavor Bombs gives you the lowdown.


What are Flavor Bombs?

Flavor Bombs are combinations of savory, sautéed aromatics, fresh herbs, or sauce reductions blended together and frozen in ice cube trays, small containers, small bowls, or even just spooned onto a tray lined with wax paper. They are also a great way to reuse plastic containers, such as small sauce containers with lids and egg cartons. Once they’re frozen, you transfer them to an airtight container or resealable freezer bag and they’re ready to add a flavor explosion to your meals.

The ingredients are chopped by hand, in a food processor, or even pounded with a mortar and pestle, depending on how rustic or refined you want your Flavor Bomb blends to be. Fresh ingredients may be preferable but using pre-prepped, chopped vegetables in containers or even frozen vegetables will produce very similar results. The herbs, however, should always be fresh.

Making Flavor Bombs is an excellent way to take advantage of specials in your market’s produce department. Stock up, chop up, and free up time and money! Go that extra mile when you buy that pricey batch of herbs or exotic vegetable, make enough for leftovers, and then make a Bomb out of it.


Components of a Successful Flavor Bomb

A successful flavor bomb includes the five basic tastes: sweetness, sourness, bitterness, saltiness, and umami. Along with the other ingredients in your dish, you may detect these flavors now more than ever since you are creating the background or building block of the dish with Flavor Bombs. By the way, spicy is not a taste, it hits the pain receptors, not the taste buds—so go as spicy as you dare!

Sweetness: Found in “sweet” vegetables, such as onions and carrots, sugars are drawn out when these vegetables are caramelized.

Sourness: Found in vinegar and lemon, sourness brings a brightness to the tongue, which contrasts nicely with rich, savory flavors and can help cut through fattiness.

Bitterness: Different than sourness, bitterness can be considered unpleasant but yet rounds out richness and adds another dimension of taste to dishes. It is found in citrus peel, herbs, and leafy greens.

Saltiness: Identified with foods containing sodium, such as soy sauce, miso paste, and even celery, salt harmonizes and brings out the flavors of foods when used in moderation. It shares some characteristics with umami.

Umami: This Japanese word means “yummy” or “delicious” (and it is). Umami has a meaty, savory taste that is found in miso paste, soy sauce, tomato paste, and dried mushrooms.

From the Publisher


Fettunta from Flavor Bombs

Fettunta is grilled garlicked and oiled bread, the Italian version of the French tartine.

The type of bread you’ll want for your fettunta depends on the toppings. The toppings I have here, a bagna cauda and a raclette, are hearty, so I like to use bread that’s equally sturdy, like a rustic boule. Of course you can use sourdough in a pinch.

In addition to preparing these to order, you can make the fettunta for a party. Instead of assembling each slice of bread individually, prepare a big batch of each topping and set them out on the table, along with the grilled bread. Your guests can pick and choose and build their own fettunta.
Bagna Cauda Fettunta | Serves 4

Bagna cauda is usually translated as 'hot bath,' and it’s a classic dish from the Piedmont region of Italy where anchovies and garlic are bathed in warm olive oil until the flavors meld into a beautiful dip. My version turns it into a topping; with the anchovies and blistered cherry tomatoes, this is a very umami-intense fettunta.


Ingredients :

7 garlic cloves, peeled
¼ cup extra-virgin olive oil, plus more for brushing the bread
8 tablespoons (1 stick) unsalted butter
¼ cup anchovy fillets, rinsed
Freshly ground black pepper
4 slices boule or other hearty loaf
½ cup whole-milk ricotta
1½ cups Blistered Tomatoes (recipe follows)

1. Preheat a grill to high heat.

2. To make the sauce, slice 6 of the garlic cloves paper-thin.

3. Heat the oil and butter in a small saucepan over low heat until they’ve warmed and the butter foams. Add the garlic, anchovy fillets, and a crack of pepper and cook for 5 minutes. Transfer to a food processor or blender and puree.

4. Now, assemble the fettunta. Cut the remaining garlic clove in half. Brush each side of the bread slices with olive oil. Toast the bread on the cool part of your grill or in a skillet set on your stove over medium heat, then rub the halved garlic clove on each side. Place the bread on a cutting board.

5. Spread as much of the bagna cauda on each slice of bread as you’d like, then top each with 2 tablespoons of the ricotta. Pile the blistered tomatoes on top. Serve.

6. If you have leftovers, the remaining bagna cauda can be refrigerated for up to 3 days. It also can be used as a dip for raw vegetables.


Blistered Tomatoes | Makes about ½ cup

Tomatoes naturally have a lot of glutamates and if you blister them to trigger the Maillard reaction, you’ll bring out even more of their natural umami. Using oil from the Garlic Confit is not mandatory, but if you have it, it adds a nice garlicky flavor to the tomatoes. I use cherry tomatoes in this recipe, but the method works using whole tomatoes, too.

1. Preheat the oven to 325°F.

2. Halve the tomatoes and place them in a large ovenproof skillet, preferably cast-iron. Season with salt and pepper to taste, then spoon in enough oil to coat the tomatoes generously. Arrange them in the skillet, cut side down, and roast for 30 to 45 minutes, until their skins shrivel and char slightly and the tomatoes collapse slightly upon themselves.

3. Store the blistered tomatoes in a covered container in the fridge for up to a day.

Wednesday, April 25, 2018

The Classical Belguin Waffle Recipe by the Bard of Bat Yam (#BardOfBatYam), Poet Laureate of Zion (#PoetLaureateOfZion) and Stephen Darori (#Stephendarori,@stephendarori)

Image result for belgian waffles

MAKES:5 servings
TOTAL TIME:Prep/Total Time: 20 min.


INGREDIENTS
2 cups all-purpose flour
3/4 cup sugar
3-1/2 teaspoons baking powder
2 large eggs, separated
1-1/2 cups milk
1 cup butter, melted
1 teaspoon vanilla extract
Sliced fresh strawberries or syrup
DIRECTIONSIn a bowl, combine flour, sugar and baking powder. In another bowl, lightly beat egg yolks. Add milk, butter and vanilla; mix well. Stir into dry ingredients just until combined. Beat egg whites until stiff peaks form; fold into batter.Bake in a preheated waffle iron according to manufacturer's directions until golden brown. Serve with strawberries,choclate syrup, blueberries or just about anything sweet  that you can think of .. 

Yield: 10 waffles (about 4-1/2 inches).


NUTRITIONAL FACTS

Wednesday, April 11, 2018

KITCHEN MATTERS More than 100 Recipes and Tips to Transform the Way You Cook and Eat– Wholesome, Nourishing, Unforgettable by Pamela Salzman Publisher: Da Capo Publication Date: June 13, 2017 (IBRCookBooks)


Pamela, her husband and family attend Congregation Tikvat Jacob Beth Torah in Manhattan Beach, CA. A graduate of Penn, with an MBA from UCLA, Salzman pursued a love and skill for cooking. In this new cookbook, Salzman shares a simple but powerful mantra with the students who attend her cooking classes: Eat well, live well, be well.

In “Kitchen Matters,” she shares the veggie-forward, anti-inflammatory and nutrient-dense recipes that have won the praise of her fans, both celebrities and regular folk. See her salad recipe below.

Saturday Chopped Salad
By:Pamela Salzman of Kitchen Matters

Servings: Serves 6

Ingredients
For the Salad:
1 head romaine lettuce finely chopped (about 6 cups)
3 cups diced red cabbage
3 radishes
1/2 pint cherry tomatoes quartered (optional)
1/3 cup pickled shallots diced (or 5 pepperoncini seeded and finely chopped)
1/2 bunch chives finely chopped
2 persian cucumbers finely diced
2 carrots finely diced or julienned and finely chopped
1 avocado peeted, pitted, and diced
3 ounces feta (preferably goat’s milk feta, crumbled) (omit for vegan or DairyFree)
optional: quinoa, diced cooked chicken, tuna in olive oil, canned salmon, chopped hard-boiled egg, chickpeas

For the Dressing:
1 small shallot minced (about 2 teaspoons)
3/4 to 1 teaspoon sea salt
1 pinch black pepper
1 teaspoon Dijon mustard
2 teaspoons raw honey (omit for vegan) or pure maple syrup
2 tablespoons unpasteurized cider vinegar or red wine vinegar
2 tablespoons unseasoned rice vinegar
3/4 cup unrefined, cold-pressed extra-virgin olive oil or 1/2 cup olive oil + 1/2 cup flax oil

Instructions

For the Salad:
Combine the lettuce and cabbage in a large bowl. Add the radishes, cherry tomatoes, pickled onions, chives, cucumber, and carrots. Toss with enough dressing to coat lightly. Add the avocado and feta and drizzle with a small amount of dressing. Toss very gently with your hands to incorporate into the salad without smearing avocado and feta everywhere.

For the Dressing:
Either whisk together all the ingredients, including black pepper to taste, in a small bowl or place them in a glass jar with a lid and shake until emulsified.
The dressing can be made ahead and kept in a glass jar in the refrigerator for 5 to 7 days. Because olive oil solidifies when chilled, you will need to remove it from the refrigerator well before you want to use it, for it to become pourable. Or you can leave the dressing at room temperature in a cool, dark place for a few days. If you use flax oil in the dressing, it must stay refrigerated.

CHOCOLATE CHIP MATZO MEAL COOKIES, a recipe by the Bard of Bat Yam, Poet Laureate of Zion and Stephen Darori

Image result for CHOCOLATE CHIP MATZO MEAL COOKIES

Makes about 50 cookies.
1 cup matzo cake meal
¼ cup EACH: matzo meal, potato starch
¾ teaspoon baking soda
1 teaspoon kosher salt
16 tablespoons (2 sticks) unsalted butter, room temperature
1 cup granulated sugar
? cup (packed) light brown sugar
2 teaspoons vanilla extract
2 large eggs
2 cups chocolate chips
Place a rack in the middle of the oven and preheat the oven to 375 degrees. Line two baking sheets with parchment paper.
In a small bowl, whisk together the matzo cake meal, matzo meal, potato starch, baking soda and salt.
In a stand mixer fitted with the paddle attachment, beat the butter on medium speed until light and fluffy, 1 minute. Add the granulated and brown sugars and beat for 2 minutes, scraping down the sides as needed with a rubber spatula. Add the vanilla, beating until combined, then add the eggs one at a time, beating for 1 minute after each to incorporate. Reduce the speed to low and add the dry ingredients in three batches. Fold in the chocolate chips.
Using a 1-tablespoon measure, scoop the batter onto the prepared baking sheets, leaving 2 to 3 inches between cookies — they will spread during baking. Bake one sheet at a time until the cookies are evenly golden-brown, 8 to 10 minutes, rotating the sheet after 4 minutes. Remove from the oven and let the cookies rest on the baking sheet for 1 minute, then transfer to a wire rack to cool. Repeat with remaining dough, cooling the baking sheets between batches. Once the cookies have fully cooled, store them in an airtight container for up to 2 weeks.

Monday, April 9, 2018

Sarah Kaplan Drus's Stuffed Cabbage (Holishkes) Recipe, updated by the Bard of Bat Yam (#BardOfBatYam), Poet Laureate Of Zion ( #PoetLaureateOfZion) and Stephen Darori (@stephendarori, #stephendarori, #stephendrus)


Image result for Holishkes

2 hrs 45 mins
Prep: 45 mins,
Cook: 2 hrs
Yield: 20 Cabbage Rolls (10 servings)(20)


This Ashkenazi (Eastern European) Jewish stuffed cabbage recipe, or holishkes, is a traditional dish for Sukkot, the harvest festival in autumn, because when two holishkes are put together side by side, they form the shape of the Torah (two scrolls).

And, since Sukkot is followed a week later by Simchas Torah, holishkes are often served then, also. But, in general, they are enjoyed year-round by Jewish communities in Europe, the United States, and the Middle East.

This recipe has a sweet-sour sauce with raisins and is adapted from "The Hadassah Jewish Holiday Cookbook" edited by Joan Schwartz Michel (Hugh Lauter Levin Associates Inc., 2002). Here are 22 more stuffed cabbage recipes you might enjoy.

Ingredients

Cabbage:
1 head cabbage (about 4 pounds)

Sauce:
2 cans whole peeled tomatoes (2 x 28-ounces)
1 large onion (finely chopped)
1apple (Granny Smith, peeled, cored and coarsely grated)
1/4 cup lemon juice
1/4 cup sugar (white)
1/4 cup brown sugar (firmly packed)
1 teaspoon sour salt (citric acid)
1 cup raisins (dark)
1 tablespoon salt (kosher)
1/4 teaspoon black pepper

Filling:
2 pounds ground beef (chuck)
1 large onion (grated)
2 large eggs
2 tablespoons rice (raw, omit if making this for Passover)
1 tablespoon matzoh meal
2 1/2 teaspoons salt (kosher)
1/2 teaspoon black pepper


How to Make It

Prepare the Cabbage
Remove core from cabbage. Place whole head in a large pot filled with boiling, salted water. Cover and cook 3 minutes, or until softened enough to pull off individual leaves. You will need about 20 leaves.

When leaves are cool enough to handle, use a paring knife to cut away the thick center stem from each leaf, without cutting all the way through.

Make the Sauce
Place tomatoes and their juices in a medium-large saucepan. Crush tomatoes with a wooden spoon. Bring to a boil, reduce heat and cook 15 minutes or until slightly thickened.

Stir in onion, apple, lemon juice, white and brown sugars, sour salt, raisins, kosher salt and pepper, and return to a boil.

Reduce heat and simmer 15 minutes longer. Add more sugar or more lemon juice for the sweet-sour taste you prefer. Set sauce aside.
Make the Filling
In a large bowl, mix ground beef, grated onion, eggs, rice, if using, matzoh meal, 2 1/2 teaspoons salt and 1/2 teaspoon pepper, mixing thoroughly. Don't overmix or the meat will become tough.

Assemble the Rolls and Cook
Place about 1/2 cup of meat on each cabbage leaf. Roll away from you to encase the meat. Flip the right side of the leaf to the middle, then flip the left side. You will have something that looks like an envelope. Once again, roll away from you to create a neat little package.

Spoon a thin layer of sauce in the bottom of a large casserole dish or Dutch oven. Chop any remaining cabbage leaves and place over the sauce.

Arrange cabbage rolls, seam-side down, on top of the chopped cabbage leaves in as many layers as necessary. Pour remaining sauce over stuffed cabbage.

Bring to a boil on the stovetop, reduce heat to low, cover and cook 1 1/2 to 2 hours or until filling is cooked and cabbage is tender.


Sunday, April 1, 2018

Fay Drus's Brisket , a receipe by the Baed of Bat Yam (#BardOfBatYam) , Poet Laureate of Zion (#PoetLaureateOfZion) and Stephen Darori


Gedempte Fleysch - well-stewed – that's how Eastern European Jews prefer their meat. Slow cooking, of course, became a practical necessity with grainy cuts of forequarter meat.

Because a brisket stretched into many meals, it was an economical cut for large families in Europe. Leftovers were ground up to stuff knishes or kreplach. The meaty gravy became the base for a midweek cabbage or potato soup or a sauce to cover pompushki, Ukrainian baked dumplings, which resemble Pepperidge Farm's rolls. In this country it became particularly popular.

Brisket comes from the front quarters of the steer, the chest area. The whole piece of meat, from three to ten pounds, is potted (hence the term pot roast) and cooked slowly for hours. Brisket needs to be simmered slowly to transform it into the succulent morsels I remember as a child. It is a dish I serve frequently – on Friday night, at holidays, and at dinner parties.

Ingredients

2 teaspoons salt
1 5-pound brisket of beef, shoulder roast of beef, chuck roast, or end of steak
1 garlic clove, peeled
2 tablespoons vegetable oil
3 onions, peeled and diced
1 10-ounce cans tomatoes
2 cups red wine
2 stalks celery with leaves, chopped
1 bay leaf
1 sprig fresh thyme
1 sprig fresh rosemary
¼ cup chopped parsley
6 to 8 carrots, peeled and sliced on the diagonal

Directions

Sprinkle the salt and pepper over the brisket and rub with the garlic. Sear the brisket in the oil and then place, fat side up, on top of the onions in a large casserole. Cover with the tomatoes, red wine, celery, bay leaf, thyme, and rosemary.
Cover and bake in a preheated 325-degree oven for about 3 hours, basting often with pan juices.
Add the parsley and carrots and bake, uncovered, for 30 minutes more or until the carrots are cooked. To test for doneness, stick a fork in the flat (thinner or leaner end of the brisket). When there is a light pull on the fork as it is removed from the meat, it is "fork tender."
This dish is best prepared in advance and refrigerated so that the fat can be easily skimmed from the surface of the gravy. Trim off all the visible fat from the cold brisket. Then place the brisket, on what was the fat side down, on a cutting board. Look for the grain – that is, the muscle lines of the brisket – and with a sharp knife, cut across the grain.
When ready to serve, reheat the gravy.
Put the sliced brisket in a roasting pan. Pour the hot gravy on the meat, cover, and reheat in a preheated 350-degree oven for 45 minutes. Some people like to strain the gravy, but I prefer to keep the onions because they are so delicious.

For Passover serve with potato pancakes or potato kugel. A colorful salad goes well with this.

During the year, serve with farfel (boiled egg barley noodles), noodle kugel, or potato pancakes.

Fay Drus's Brisket in Sweet and Sour Sauce


"Please don't believe anyone who will tell you first-cut brisket is not as moist and tender as its second-cut counterpart: Taste this! Just make certain you are not getting some obscure slab of dry stringy meat masquerading (and priced) as first-cut brisket."

Ingredients

1 medium onion, quartered
1 2-inch piece fresh ginger, peeled
6 large garlic cloves, peeled
¼ cup Dijon mustard (omit on Passover)
½ cup dry red wine
½ cup coke
1-cup ketchup
¼ cup honey
¼ cup cider-vinegar
¼ cup soy sauce (omit on Passover)
½ cup olive oil
½ teaspoon ground cloves
1 tablespoon coarsely ground pepper
1 first-cut brisket, six to seven pounds, rinsed and patted thoroughly dry

Directions


Preheat the oven to 350*F. Process all but last ingredient in a food processor until smooth. Place the brisket in a pan just big enough to fit it, and pour on the marinade. Cover tightly with a double layer of foil, and bake for 2 hours. Turn the brisket over, and bake uncovered for 1 more hour. Transfer the brisket to a cutting board. Transfer the sauce to a saucepan and reduce to about 2½ cups. Skim the oil off the top. Let the brisket cool slightly. Slice thin against the grain (if the slices look too long, cut the brisket in half across its whole length before slicing). Pour the gravy on top, and serve hot.

No problem freezing this brisket. Here's how I like to do it: Slice the brisket. Place the slices side by side vertically in a pan, tightly packed together like a deck of cards, just as if you were serving it now, and pour your gravy over it. Cover the pan airtight, and freeze. To reheat: place the frozen pan at 250 degrees for about 1 hour, or a little longer, until heated through. Or: leave the pan out to thaw a few hours, then reheat at 300 degrees for about 30 minutes, or a little longer, until heated through.
Makes 12 ample servings.